
Gadgets
How to transcribe text for free using AI

AI has been used for various tasks, including understanding spoken language and taking action on it, long before it was used for generating videos and coding programs. AI powers virtual assistants like Alexa, Siri, and Google Assistant, allowing users to interact with them through voice commands.
These AI algorithms can also be utilized to create digital transcripts from audio files containing speech, such as meetings, interviews, lectures, or voice notes. Transcripts provide a written record of spoken content, making it easy to search and reference.
While popular transcription services like Rev and Happy Scribe offer limited free transcription, you can transcribe audio files for free using Whisper. Whisper is a speech-to-text engine developed by OpenAI, known for ChatGPT, with no usage limits.
You have the option of using the web version of Whisper hosted on Hugging Face, which is convenient but can be busy during peak times. Alternatively, you can install the software locally on a Windows computer for faster transcriptions, but it requires a capable PC to handle the AI processing demands.
Whisper on the web
With Whisper on Hugging Face, you can transcribe audio files directly in your browser without needing to create an account. You can upload audio files from your computer or record speech using a connected microphone. It’s important to note that your audio may be used to enhance future AI models, although the privacy policies of OpenAI and Hugging Face are not explicitly clear on this.
To upload and process an audio file:
- Open the Audio file tab.
- Choose Click to Upload.
- Select an audio file.
- Check the Transcribe box.
- Click Submit.
After a short wait, the transcribed text will appear on the right side of the screen. Processing times vary based on the audio file’s length and server activity. Due to the popularity of the free service, there may be a queue for processing files.
The interface offers useful tools, such as the ability to trim the audio clip by using the pen icon above the playback bar. This feature is handy for removing silences or irrelevant sections of the audio.
You can also switch to the Microphone tab to record audio directly into Whisper or switch to the YouTube tab to transcribe videos. YouTube automatically adds transcripts to some videos, which can be found in the comments section.
Whisper on Windows
If you experience delays on the Whisper web app or prefer local processing, you can set up the AI model on a Windows computer. This method requires a CUDA-capable graphics card with at least 4GB of VRAM for processing. The setup is more complex and lacks a user interface, but it offers faster processing and avoids queue delays.
To install Whisper on Windows, you need to install Python, PyTorch, Chocolatey, and FFmpeg on your computer. These installations come with instructions on their respective websites. Once installed, you can transcribe audio files by following these steps:
- Open the folder containing your audio files in File Explorer.
- In the address bar, type “cmd” and press Enter.
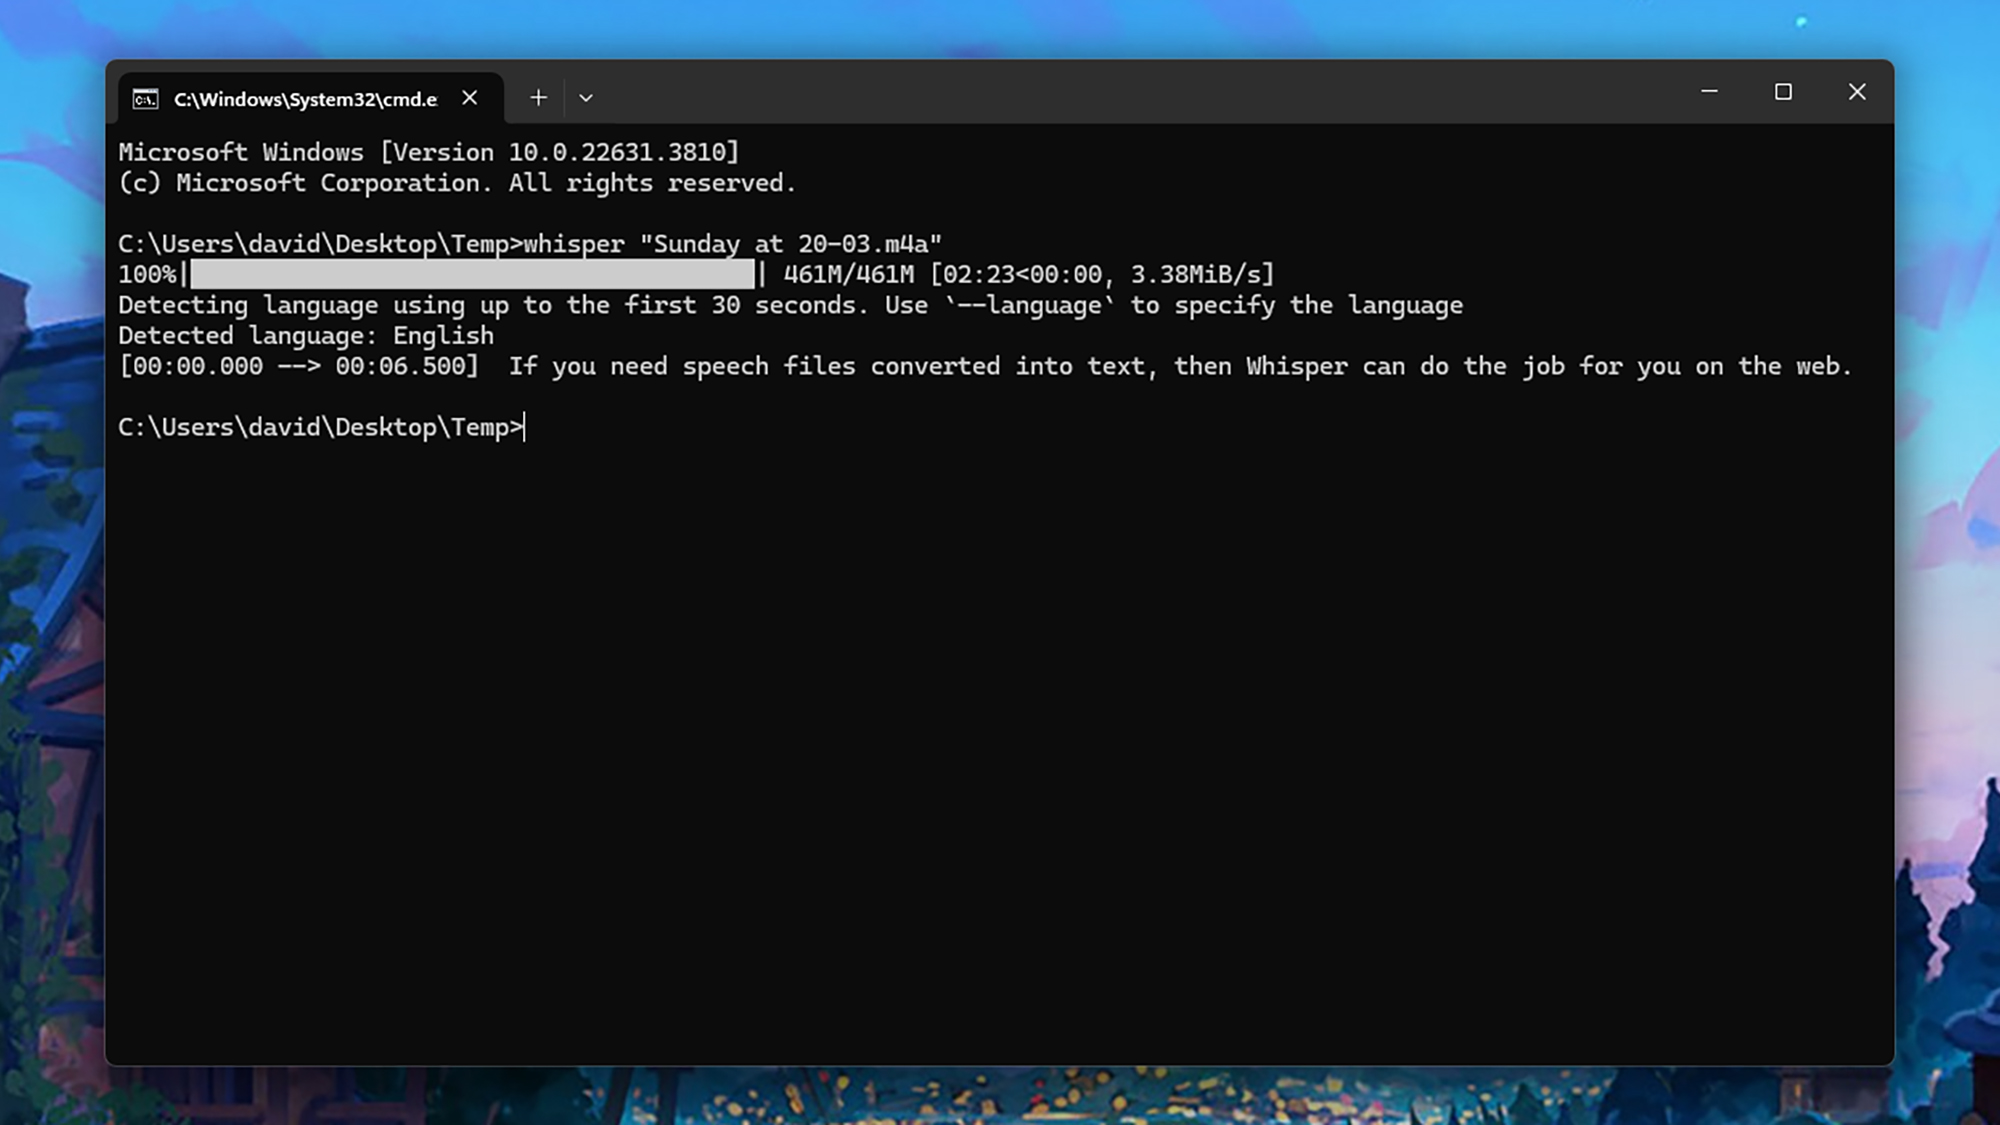
- Type “whisper” followed by a space and the name of your audio file.
- Press Enter to start the processing.
The transcribed text will be displayed on the screen and saved as text files in the same folder as the audio file. To transcribe multiple files simultaneously, list all the file names after the “whisper” command, separated by spaces.
Even if you’re unfamiliar with Python or the command prompt, there are guides available online to assist you through the installation and transcription process. One recommended tutorial provides step-by-step instructions and explains advanced functions, such as switching to a different AI model.


17 Babushka Dolls Mums Recommend

5 Amazing Benefits Of Stacking Toy

Nordic founders are taking bigger swings, and it’s paying off

5 Apps To Speed Up Your Google TV Device

Trump threatens ABC News for reporter’s questions on his family business in Saudi Arabia, Khashoggi’s murder and Epstein files

The Best Sunglasses for Travel + Must Have Accessories » Local Adventurer » Travel Adventures in Las Vegas + World Wide

This Silent Habit Might Be Sabotaging Your Career

The Four Types of Happiness: Which One Are You Living In?

Halloween Events in London 2025

Join the peaceful demonstrations for democracy

Croatia to reintroduce compulsory military draft as regional tensions soar

Singapore Airlines CEO set to join board of Air India, BA News, BA

Supernatural Season 16 Revival News, Cast, Plot and Release Date

How Your Contact Center Can Become A Customer Engagement Center

Bangladeshi police agents accused of selling citizens’ personal information on Telegram
Google Pixel 9 Pro vs Samsung Galaxy S25 Ultra: Camera Comparison Review

The Criterion Collection announces November 2024 releases, Seven Samurai 4K and more

15 of the Best Trike & Tricycles Mums Recommend

Have Unlimited Korean Food at MANY Unlimited Topokki!

Soccer team’s drone at center of Paris Olympics spying scandal
-
 Breaking News2 years ago
Croatia to reintroduce compulsory military draft as regional tensions soar
-
 Destination2 years ago
Singapore Airlines CEO set to join board of Air India, BA News, BA
-
 Gadgets1 year ago
Supernatural Season 16 Revival News, Cast, Plot and Release Date
-
 Productivity2 years ago
How Your Contact Center Can Become A Customer Engagement Center
-
 Tech News2 years ago
Bangladeshi police agents accused of selling citizens’ personal information on Telegram
-

 Gadgets1 year ago
Google Pixel 9 Pro vs Samsung Galaxy S25 Ultra: Camera Comparison Review
-
 Gaming2 years ago
The Criterion Collection announces November 2024 releases, Seven Samurai 4K and more
-
 Toys2 years ago
15 of the Best Trike & Tricycles Mums Recommend